Building my own router
Ars Technica recently published an article about building your own router. Since I built my own router a few months ago, this article inspired me to write up what I did.
Hardware
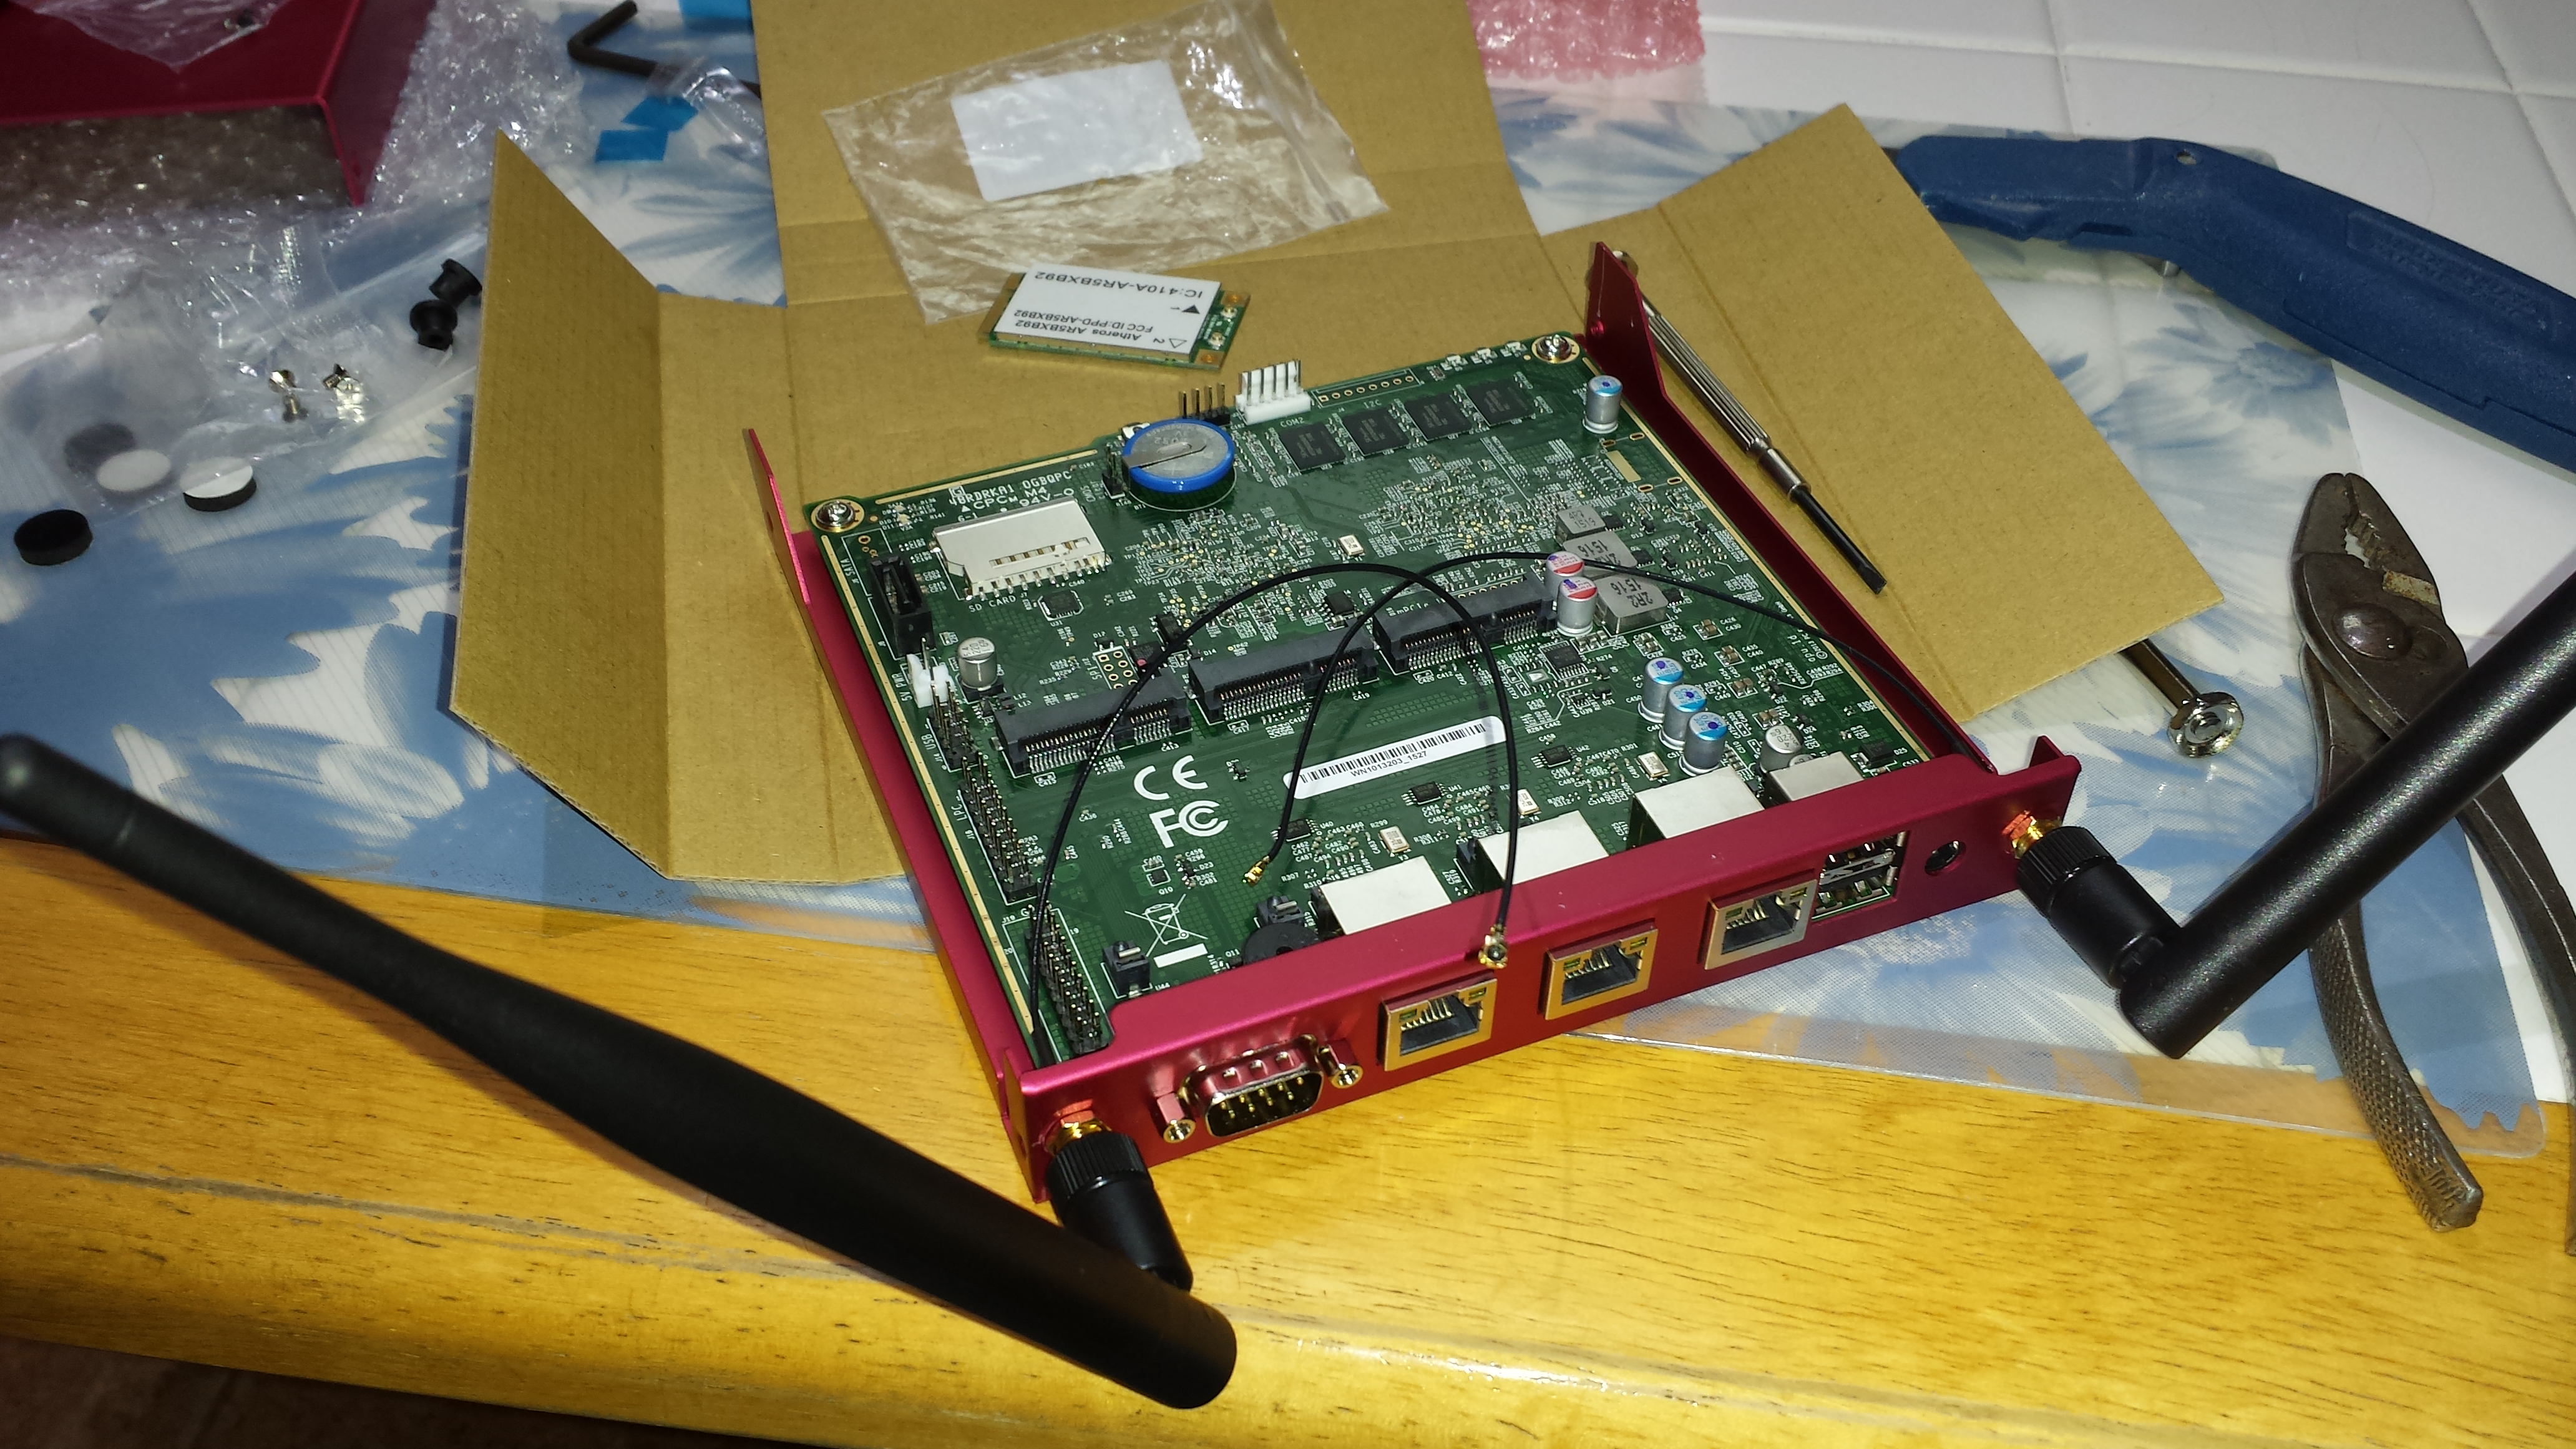
I used the apu1d4 from PC Engines. It is small and fanless, with no video, and three Ethernet ports. It has a dual-core x86_64 processor, with 4 GB of RAM, so it has lots of horsepower compared to a typical router. To make it look cool, I put it in case1d2redu. I bought it from the US distributor Mini-Box.
Support for wireless needs to be added via a mini PCI Express card. I chose this card, which is supported in Linux via the ath9k driver.
To round it out, it needs a power supply, antennas, pigtails, and an SD card to boot from. I wanted a longer power cord, so I bought this three-foot extension. And since I’m building my own router, I bought a Time-Warner approved cable modem without a built-in router to use with it.
Software
I’d originally thought about using OpenBSD, but I ruled that out when I discovered that OpenBSD doesn’t support 802.11n.
So, Linux was the obvious choice, but which distribution? Unfortunately, most distributions (e. g. Debian) require a video card (which the APU doesn’t have) to run the installer. What I wanted was a distribution that came as an image I could copy directly to an SD card, like Raspbian for the Raspberry Pi.
I eventually settled on OpenWRT. In some ways, this is the obvious choice, since it’s a distribution designed for use on wireless routers. In other ways, it wasn’t the obvious choice, since it seems primarily geared at resource-constrained MIPS systems, and I had a very capable x86_64 system. But the deciding factor was that it can be copied directly to an SD card, with no installer, and no need for video.
Unfortunately, it wasn’t quite that easy, because x86_64 is exotic hardware in the OpenWRT world, so there are no pre-built binaries for x86_64. There are binaries for 32-bit x86, but OpenWRT’s page for APU indicated that although the 32-bit image would work, it was not ideal, since it would only use 1 core and 1 GB of RAM, and the serial console’s baud rate differed from coreboot’s baud rate. Therefore, I decided to build my own OpenWRT image specifically for the APU.
This process turned out to be a bit fiddly, and I don’t think I can remember every issue I ran into, but I’ll try to hit the highlights. The most recent stable release of OpenWRT is Chaos Calmer, which is what I should have used. However, I ran into some issues trying to build Chaos Calmer (some 404 errors as it tried to download some things), so I switched to Designated Driver, the unstable release. This isn’t the “correct” thing to do, but it worked for me.
The instructions for building OpenWRT were split across the buildroot.exigence and build wiki pages in a way that seemed a bit confusing and counter-intuitive to me, and I had to keep flipping between the two. But the basic idea is to clone OpenWRT from git (counter-intuitively, each release seems to be in a different repo, rather than different branches in the same repo) and then make menuconfig to select options, followed by make -j2 (or however many cores you have) to build the image. Pleasantly, the build process itself is highly automated and reliable, apart from the previously mentioned 404s when I first tried building Chaos Calmer.
After cloning the repo, I installed the luci feed, which gives OpenWRT a web interface more like a typical consumer router, and the zile feed, since I consider Emacs to be an absolute requirement for any computer I use, and OpenWRT doesn’t seem to offer full-blown GNU Emacs, so zile is the closest thing to it.
scripts/feeds update -a
scripts/feeds install luci
scripts/feeds install zile
My output for scripts/diffconfig.sh (which describes what I changed in make menuconfig) is:
CONFIG_TARGET_x86=y
CONFIG_TARGET_x86_64=y
CONFIG_TARGET_x86_64_Default=y
CONFIG_DRIVER_11N_SUPPORT=y
CONFIG_DRIVER_11W_SUPPORT=y
CONFIG_KERNEL_RELAY=y
CONFIG_LIBCURL_COOKIES=y
CONFIG_LIBCURL_FILE=y
CONFIG_LIBCURL_FTP=y
CONFIG_LIBCURL_HTTP=y
CONFIG_LIBCURL_NO_SMB="!"
CONFIG_LIBCURL_POLARSSL=y
CONFIG_LIBCURL_PROXY=y
CONFIG_PACKAGE_ATH_DFS=y
CONFIG_PACKAGE_MAC80211_DEBUGFS=y
CONFIG_PACKAGE_MAC80211_MESH=y
CONFIG_PACKAGE_curl=y
CONFIG_PACKAGE_hostapd=y
CONFIG_PACKAGE_hostapd-common=y
CONFIG_PACKAGE_iw=y
CONFIG_PACKAGE_kmod-ath=y
CONFIG_PACKAGE_kmod-ath9k=y
CONFIG_PACKAGE_kmod-ath9k-common=y
CONFIG_PACKAGE_kmod-cfg80211=y
CONFIG_PACKAGE_kmod-mac80211=y
CONFIG_PACKAGE_libcurl=y
CONFIG_PACKAGE_libiwinfo=y
CONFIG_PACKAGE_libiwinfo-lua=y
CONFIG_PACKAGE_liblua=y
CONFIG_PACKAGE_libncursesw=y
CONFIG_PACKAGE_libpolarssl=y
CONFIG_PACKAGE_libubus-lua=y
CONFIG_PACKAGE_libuci-lua=y
CONFIG_PACKAGE_lua=y
CONFIG_PACKAGE_luci=y
CONFIG_PACKAGE_luci-app-firewall=y
CONFIG_PACKAGE_luci-base=y
CONFIG_PACKAGE_luci-lib-ip=y
CONFIG_PACKAGE_luci-lib-nixio=y
CONFIG_PACKAGE_luci-mod-admin-full=y
CONFIG_PACKAGE_luci-proto-ipv6=y
CONFIG_PACKAGE_luci-proto-ppp=y
CONFIG_PACKAGE_luci-theme-bootstrap=y
CONFIG_PACKAGE_rpcd=y
CONFIG_PACKAGE_terminfo=y
CONFIG_PACKAGE_uhttpd=y
CONFIG_PACKAGE_uhttpd-mod-ubus=y
CONFIG_PACKAGE_zile=y
CONFIG_TARGET_ROOTFS_PARTSIZE=900
CONFIG_USE_LIBSTDCXX=y
# CONFIG_USE_UCLIBCXX is not set
Note that CONFIG_PACKAGE_terminfo=y was necessary to avoid the error Error opening terminal: xterm-256color when running zile.
The build product is bin/x86/openwrt-x86-64-combined-ext4.img.gz. Although I built the image on an Ubuntu machine, I ended up using my Mac to copy the image to an SD card. Using the same instructions for copying Raspbian to an SD card, I did the following, but of course disk2 might be a different number for you:
gunzip openwrt-x86-64-combined-ext4.img.gz
diskutil list
diskutil unmountDisk /dev/disk2
sudo dd bs=1m if=openwrt-x86-64-combined-ext4.img of=/dev/rdisk2
sudo diskutil eject /dev/rdisk2
I connected my Mac directly to eth0 on the APU. OpenWRT expects eth0 to be the LAN port, and eth1 to be the WAN port.
Then, after booting the APU from the SD card, and reading the firstlogin wiki page, I did the following on the Mac:
scp ~/.ssh/id_rsa.pub root@192.168.1.1:/etc/dropbear/authorized_keys
ssh root@192.168.1.1
and then the following in the ssh session to the APU:
chmod 0600 /etc/dropbear/authorized_keys
passwd
echo /etc/dropbear/authorized_keys >> /etc/sysupgrade.conf
For more on sysupgrade, see the generic.sysupgrade wiki page. This is a very handy feature, since it means I can build and install new images without having to copy them manually to the SD card again. This is especially handy on the APU, since removing the APU’s SD card requires unscrewing the case.
Using eth2
The APU has three Ethernet ports, and I wanted to use eth2 as a second LAN port. To do this, go to Network > Interfaces in LUCI:
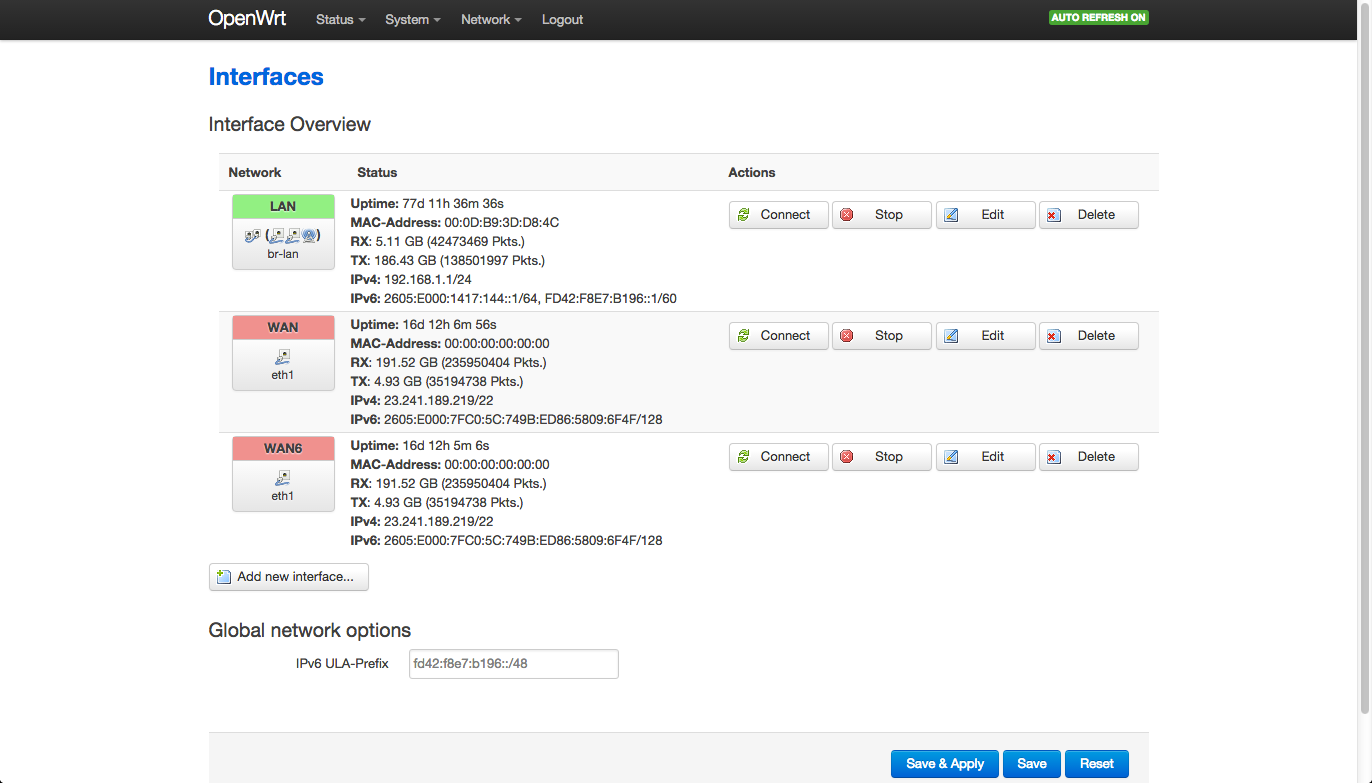
The LAN interface is br-lan, which is several physical interfaces bridged into one. To add eth2 to it, click Edit.

Now just check eth2 to add it to the bridge, and click Save & Apply.